Text Code Bold {b} and {/b} Usage: This {b}bolds{/b} your text. ---> This bolds your text. Italics {i} and {/} Usage: This {i}italicizes{i} your text. ---> This italicizes your text. Underline {u} and {/u} Usage: This {u}underlines{/u} your text. ---> This underlines your text. Left Aligned Text {left} and {/left} Usage: {left}This text is left-aligned{/left} --> This text is left-aligned Right Aligned Text {right} and {/right} {right}This text is right-aligned{/right}--> This text is right-aligned Center Aligned Text {center} and {/center} Usage: {center}Lets you center text or an image in the exact middle of your post. {/center} ---> Lets you center text or an image in the exact middle of your post. Shadowed Text {shadow} and {/shadow} --->Usage
This is shadowed text! But you can get more control with "shadow2". It's a bit more tricky as it gets four parameters. Color, as before, then three numbers: offsetX and offsetY, which tell the code to place the shadow so many pixels to the right and bottom of the text, and blur radius. The higher blur is, the more blurry your shadow is. 0 is the minimum and renders a shadow that's just as sharp as the text.
Center the shadow on the text and you can achieve glow effects! Font {font=fontype} and {/font} Usage: This lets you change {font=Palatino}font types{/font} in text. ---> This lets you change the font types in text. All the standard font types work. Style Code Hints: {style=font-size:400%} to get larger sizes than the {size=200 } tag gives in BBC code. Remember to replace the vulture wing brackets with straight ones. Google font {googlefont=fontype} and {/googlefont} Google maintains a growing list of embeddable fonts that can be viewed here. Once you use googlefont everyone with a modern browser will see the font even if they don't have it installed on their computer. Simply pick your font and use its name in the command. Webfont {webfont=fontype} and {/webfont} Usage: This lets you display a font that Mizahar has loaded onto its site in your posts so you don't have to use 'websafe' fonts that the font option lets you use. If you use 'font' and the viewer does not have that specific font loaded into their computer, they will see a standard game font rather than your fancy work. That's where webfonts comes in. Note that these are .ttf fonts and won't work in Internet Explorer 8 and older. Requests for free-use non-licensed fonts to be added can be made via the help desk. Complete List of Webfonts Available Indent {indent} and {/indent} Usage: {indent}Though impossible to tell with such a short paragraph, this function will indent a paragraph on both sides.{/indent} ---> Though impossible to tell with such a short paragraph, this function will neatly indent text on both sides. Color {color} and {/color} Usage: Her lips were blood {color=red}red{/color]. ---> Her lips were blood red. Strikeout {del} and {/del} Usage: Lets you {del}strikeout{/del} or {del}delete{/del} text with a line through it. ---> Lets you Spoilers {spoiler}text{/spoiler} and {spoiler=text}text{/spoiler} Usage: {spoiler}This is a secret. ---> Secret :
NPC Info :
Flash {flash} and {/flash} Usage: {flash}http://www.mizahar.com{/flash} ---> Quotes {quote} and {/quote} Usage: {quote}Hi! How are you!{/quote} --->
Scrollover {ooc=OOC} and {/ooc} Usage: {ooc=OOC INFO}Here's the OOC info you need.{/ooc} Example ScrolloverMizahar's scrollover allows you to even import images into this scrollover or entirely new pages. Coumns {columns=X} and {/columns} Usage: {columns=X}Text in X columns {/columns} It is especially useful for displaying long lists, for example in a CS. X of course equals the number of columns.
Frames {frame=Color} and {/frame} Usage: {frame=Black} text of this post {/frame} See the entire text of this post for an example. You can change color either using the proper color title like 'black' or by using the format #000000. No ' markings are needed. Frames Within Frames {frame2} and {/frame2} Usage: {frame2=#FFBF80}Frame Inside a Frame{/frame2}
Pictures As Frames {framepic} and {/framepic} Usage: {framepic=URL of Image}Text Within Frame{/framepic}
Transparent Frames {frametrans=color,number} and {/frametrans} Usege: This allows you to place a frame within a frame that has a level of transparency to it. This is idea for layering with framepic. COLOR is a color, like black or #000000, and NUMBER is a number 1-9, with 1 being 10% opacity and 9 being 90%. Imagine how nice these will look over pictures verses just the flat boring black. Boxes {box=width in pixiles, background color, border color and text color} and {/box} Usage: Lets you create a fixed box with specified width, background color, border color and text color. Example Produces: {box=400,black,green,#2244CC}Normally these things are a whole lot bigger in terms of boxes. You can put whole posts, add images in, etc.{/box} Normally these things are a whole lot bigger in terms of boxes. You can put whole posts, add images in, etc. Wiki {wiki} and {/wiki} Usage: Lets you link something like NPC {wiki}Kova{/wiki} directly to the wiki page devoted to her. ---> Lets you link something like the NPC Kova directly to the wiki page devoted to her. Tables Adding Simple Tables {table} and {/table} Usage: {table}{u}Tables{/u} are | implemented and | we are probably the first phpBB | site to have tables | with simple syntax as this stuff | was nowhere on the net. | I'm afraid it will have | to be centered on | the page, though.{/table} -->
Adding Colored Tables Usage: {table2=backgroundcolor,bordercolor} and {/table2} So, {table2=#336699,#223322} aaa | bbb | ccc ddd | eee | fff{/table2} --->
Tabs {tabset} {tab} and {/tabset} {/tab} Usage: {tabset=200}{tab=First tab,#000044,white}Contents of first tab{/tab} {tab=Second tab,#003377,white}Contents of second tab{/tab}{/tabset} ---> First tab
Contents of first tab Second tab
Contents of second tab Images Adding Images {img} and {/img} Usage: {img}http://i464.photobucket.com/albums/rr8/Centaurheart/becky.jpg{/img}---> 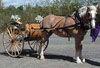 This allows you to add an image anywhere in a post. Feel free to cage the image with other BBC code like center. Floating Images {img2=left} and {/img} or {img2=right} and {/img2} Usage: {img2=left}]http://i464.photobucket.com/albums/rr8/Centaurheart/becky.jpg{/img} ---> This floats an image at one side of a page or another and allows you to place text beside the image. If you use the word left it floats the image left. If you use the word right, it floats the image on the right. Links Inserting Links {url} and {/url} or {url=Option} and {/url} Usage: {url}http://www.mizahar.com{/url} --->http://www.mizahar.com or {url=http://www.mizahar.com}Mizahar{/url}--->Mizahar Inserting Music/MP3s {mp3}Link to music hosting site like fileden.com or filefreak.com{/mp3} Video {youtube}video code here{/youtube} ----> In this case, the link is to Rascal Flatt's song Stand. The URL is http://www.youtube.com/watch?v=-N0yB24M7VM, but you only add the -N0yB24M7VM between the tags (whatever's after the v='s). Lists {list} and {/list} or {list=1} and {/list} Usage:{list} {*}Item 1 {*}Item 2 {/list} -->
{list=1} {*}Item 1 {*}Item 2 {/list} -->
Code {code} and {/code} Usage: {code} <script type="text/javascript"> <!-- alert("This too shall pass!"); //--> </script> {/code} --->
The best and most applicable form of 'code' in Mizahar is to copy an 'example' page into 'code' and display it for the ease of cutting and pasting that sample page "ie a char sheet' or say a location template into a new post. See the stickies in Character Toolbox/Character Sheets for more details. |
- Getting Started
- Help
- Master Lists
- Useful Links
- Features
BBC Code Quick List
(This is a thread from Mizahar's fantasy roleplay forums. Why don't you register today? This message is not shown when you are logged in. Come roleplay with us, it's fun!)Here's the place to find information on 'How do I do that?' when it comes to creating avatars, signatures, calculating travel time or big purchases, or even working with the bbc code. There are help files for codework for both the main board forums and the lore sections. There are threads advertising players that are willing to create signatures for other players. Please feel free to discuss technical issues, photo cropping, suggest new bbc code, or get help from players and admins on things you want to do. This forum includes posts, wiki technical aid, avatar art, character sheet art, signature work, and all things visual when it comes to Mizahar.
BBC Code Quick List
![]() by Gossamer on June 7th, 2009, 3:46 am
by Gossamer on June 7th, 2009, 3:46 am
The following is a list of available BBC code for Mizahar complete with examples. We anticipate this list will continue to grow, so keep checking back as the Founders will update it as new code is written and implemented. Remember, to use the code, replace the vulture wing brackets { and } with solid brackets [ and ]. There are quick 'code' buttons at the top of each reply box for some of these BBC codes so you don't have to type them out completely, just highlight the item you want the BBC code to affect and hit the corresponding button.
-
Gossamer - Words reveal soul.
- Posts: 21154
- Words: 6363182
- Joined roleplay: March 23rd, 2009, 4:40 pm
- Location: Founder
- Blog: View Blog (24)
- Race: Staff account
- Office
- Scrapbook
- Plotnotes
- Medals: 11
-
")
")
-
")
")
-
")
")
-
")
")
-
")
")
Re: BBC Code for Mizahar
![]() by Tarot on November 21st, 2010, 4:58 pm
by Tarot on November 21st, 2010, 4:58 pm
The style bbcode is the most powerful tool for customizing your posts. It will give you the full power of Cascading Style Sheets (CSS), creating a box with the style specifications that you provide as a parameter. Here are a few examples, but feel free to google CSS for extensive tutorials on all available style options. All style specifications are expressed as "parameter:value;" . Also remember that, due to a technical limitation in phpBB, it is not currently possible to nest two style bbcodes (or any two bbcodes of the same type).
- Code: Select all
[style=width:500px; padding:5px; border:1px solid #335577; background-color: #443322; margin:auto;]Use margin:auto to center the box, in combination with the width parameter (500 pixels in this case)...[/style]
Use margin:auto to center the box, in combination with the width parameter (500 pixels in this case)...
- Code: Select all
[style=padding:5px; border:1px solid #335577; background-color: #443322; margin-left:50px; margin-right:50px]... or leave 50 pixels to either side by omitting width and setting margin, like this...[/style]
... or leave 50 pixels to either side by omitting width and setting margin, like this...
- Code: Select all
[style=width:300px; padding:5px; border:1px solid #335577; background-color: #443322; float:right;]... You can make it float to the left or right too, with the float command. External text will flow side-by-side with the box.[/style]
... You can make it float to the left or right too, with the float command. External text will flow side-by-side with the box.
Text does indeed flow as expected!- Code: Select all
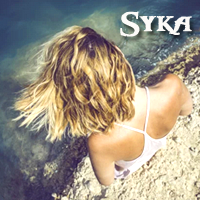
[style=width:280px; height:424px; padding:10px; color:#000000; background-image:url(http://mizahar.com/forums/gallery/pic.php?mode=large&pic_id=2); background-repeat:no-repeat;]This is a background image. Just upload your pic anywhere and use its URL![/style]
This is a background image. Just upload your pic anywhere and use its URL!
- Code: Select all
[style=width:500px; padding:5px; border: 1px dashed blue; background-color: black; margin:auto; font-family:Palatino; font-variant:small-caps;]You can do all kinds of things with CSS... feel free to read up on it. Moreover, these styles can be used in the wiki as well. :)[/style]
You can do all kinds of things with CSS... feel free to read up on it. Moreover, these styles can be used in the wiki as well. 
| Tarot's thread tickets: sold out. Not accepting any more threads for the time being unless I promised you one. Sorry for the inconvenience! |
-
Tarot - May you live in interesting times
- Posts: 2216
- Words: 766315
- Joined roleplay: March 23rd, 2009, 4:29 pm
- Location: Moderation abilities game-wide
- Blog: View Blog (11)
- Race: Staff account
- Office
- Scrapbook
- Plotnotes
- Medals: 5
-
-
")
-
")
BBC Code Quick List
![]() by Gossamer on June 29th, 2019, 10:57 pm
by Gossamer on June 29th, 2019, 10:57 pm
From this News Around The Campfire!
Tarot wrote:Hello Mizaharians,
you now have one more tool to prettify your posts: frameborder! (Disclaimer: like so many more pretty things, it doesn't work in IE.) We already have frame, framepic, frametrans... so what does this frameborder do, you ask? Why, it lets you use a picture as a frame border. Example:
Lorem ipsum dolor sit amet, consectetur adipiscing elit. Curabitur nisl nisi, hendrerit at pulvinar vel, pellentesque sit amet erat. In laoreet mauris est, tincidunt vehicula mi. Cum sociis natoque penatibus et magnis dis parturient montes, nascetur ridiculus mus. Vestibulum cursus gravida turpis, nec tristique enim elementum nec. Vivamus facilisis tristique lacus at auctor. Donec ac leo at nibh hendrerit tristique a id eros. Mauris mattis nisi non tortor mattis et tristique tellus consequat. Class aptent taciti sociosqu ad litora torquent per conubia nostra, per inceptos himenaeos. Donec id ipsum ac massa tempor tincidunt. Morbi in ultrices mauris. Suspendisse velit quam, ullamcorper ac semper nec, euismod quis lectus. Suspendisse at odio justo.
Cras commodo aliquam enim, at laoreet ligula euismod vitae. Nulla molestie nisi vel justo bibendum consequat. Aliquam non venenatis orci. Ut vitae nulla sed felis aliquet tincidunt. Vivamus mollis porttitor sapien, non adipiscing nunc semper sit amet. Mauris sagittis ornare fringilla. Proin ac diam neque
Which was obtained from this transparent PNG:
and this code:
- Code: Select all
[frameborder=36,36,36,36,0,round,http://www.mizahar.com/forums/gallery/pic.php?mode=large&pic_id=12740] ... [/frameborder]
The general format is:
- Code: Select all
[frameborder=TOP,LEFT,BOTTOM,RIGHT,INSIDE_PADDING,SLICING_MODE,IMAGE_URL] ... [/frameborder]
Let's see them one by one.
- TOP,LEFT,BOTTOM,RIGHT control the thickness of the border on the four sides. In the above example, the frame is 36 pixels thick on all sides.
- INSIDE_PADDING specifies padding pixels inside the frame: the smaller it is, the closer the text is to the frame. With 0 it's packed against the frame. With a negative value it will sink into it.
- SLICING_MODE tells the code how to slice your picture. One of three keywords: stretch, repeat or round. Stretch will make your frame, well, stretch from side to side with no repetition. Repeat will make it, ummm, repeat across the frame. And round is like repeat, except there are no partial repeats, i.e. the middle portion is repeated 8 or 9 times to fit the frame, but not 8.5. It's also ignored on Chrome/Safari where it works like repeat.
- Finally, IMAGE_URL is pretty straightforward.
Let's see a further example...
Lorem ipsum dolor sit amet, consectetur adipiscing elit. Mauris lacus est, ultricies nec pulvinar nec, consequat ac mi. Vestibulum ante ipsum primis in faucibus orci luctus et ultrices posuere cubilia Curae; Nullam ullamcorper dictum dui, ut egestas sem suscipit et. Donec vitae purus in nisl feugiat viverra in id nisi. Nulla facilisi. Cras sem nisi, rhoncus quis fermentum ut, pulvinar in massa. Fusce et elit id tellus pretium malesuada. Sed vitae arcu ornare arcu viverra porta. Proin pulvinar consequat accumsan. Nam tincidunt ligula nec eros dapibus dictum. Vestibulum consectetur, mi non lacinia aliquet, nulla turpis sodales urna, vitae egestas urna elit id neque. Proin quis velit ut metus vehicula auctor ut lobortis magna. Aenean euismod pretium nisl, nec venenatis tortor posuere id. Morbi vel odio enim.
Etiam lacus odio, accumsan et semper sit amet, cursus non elit. Aenean vulputate dapibus enim ac placerat. Proin euismod rhoncus dolor eget tempus. Sed a commodo risus. Maecenas at nunc nisi. Sed bibendum odio id tortor cursus sit amet adipiscing massa aliquam. Aenean consectetur augue blandit augue fermentum at consectetur ipsum rhoncus. Proin ac enim elementum sapien elementum dapibus. Sed ac lacus lorem. In eleifend ante pretium orci varius vulputate. Mauris dui erat, euismod ac iaculis vitae, rutrum ac mauris. Aliquam erat volutpat.
Sed rhoncus cursus nulla sit amet scelerisque. Ut nec quam eget velit interdum congue eu in ante. In hac habitasse platea dictumst. Proin ultrices tincidunt lacus, sed pulvinar diam volutpat et. Vivamus mattis pulvinar felis, sollicitudin laoreet ante volutpat ut. Suspendisse gravida neque id leo tincidunt at feugiat felis ullamcorper. Nunc nulla purus, suscipit vitae rhoncus ac, volutpat non nibh. Ut in massa elit. Maecenas congue lobortis magna, a fringilla leo dictum a. Vivamus est lectus, mattis et gravida sed, consectetur ullamcorper ante. Sed ut elementum nulla. Morbi mi est, dictum vitae ultricies elementum, condimentum non ipsum. Duis non justo neque, non congue mauris. Quisque vehicula feugiat orci, et pretium libero vulputate eget. Phasellus pellentesque, ligula sed semper aliquet, mi sem lacinia quam, sit amet euismod tortor orci ac nibh. In nisl urna, porta in pellentesque ut, porta id odio.
In congue auctor vestibulum. Nulla pharetra dignissim faucibus. Sed pharetra lectus ac lorem convallis sagittis. Morbi mi nibh, pharetra et fermentum sed, porttitor at sem. Nulla vulputate ante vitae neque faucibus ullamcorper. Maecenas sed tortor et felis porta mattis. Phasellus suscipit mi quis diam sollicitudin posuere. Maecenas molestie mauris non arcu iaculis bibendum. Nullam dapibus mi ut tortor faucibus sit amet sagittis lectus auctor. Phasellus fermentum dui sit amet ligula facilisis scelerisque vitae id mi.
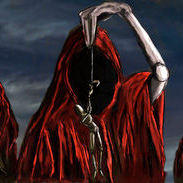
It comes from this picture:
and this code - notice how the border is 70 pixel at the top and bottom and 111 on the left and right (the column's width):
- Code: Select all
[frameborder=70,111,70,111,0,repeat,http://www.mizahar.com/forums/gallery/pic.php?mode=large&pic_id=12741] ... [/frameborder]
It's not as hard as it seems. Of course, you can put other frames inside.
-
Gossamer - Words reveal soul.
- Posts: 21154
- Words: 6363182
- Joined roleplay: March 23rd, 2009, 4:40 pm
- Location: Founder
- Blog: View Blog (24)
- Race: Staff account
- Office
- Scrapbook
- Plotnotes
- Medals: 11
-
-
-
-
-
3 posts • Page 1 of 1
Who is online
Users browsing this forum: No registered users and 0 guests